Introduction to NAS100/USD 🚀
As a professional trader, I approach NAS100/USD with a structured, rules-based mindset. Today’s play is a textbook Liquidity Sweep Reversal (LSR) short on M15 with H4 context—ideal for fading exhausted strength after a stop raid. With clearly defined invalidation and objectives, execution stays calm, mechanical, and repeatable. ✅
We’re operating in the Tokyo session, where early liquidity grabs often set the tone. The plan: allow price to sweep buy-side stops above recent highs, confirm failure to accept those higher prices, and then position for a SELL continuation into nearby inefficiencies and support. 🎯
My edge rests on consistency and sequencing, not prediction. If price rejects the raid and displaces lower with conviction, I engage; if not, I wait. Discipline isn’t about doing more—it’s about doing only what fits the plan. 🧭
Understanding Liquidity Sweep Reversal (LSR) 💡
LSR targets clustered stops near fresh extremes. When price sweeps above recent highs and then fails to accept those prices, it reveals trapped buyers and opens the door for rotation lower. Use H4 to frame bias and range; execute on M15 once acceptance fails and displacement confirms intent. 🏦
🔑 Key Components:
- 📍 Liquidity Pools: Highs around 24987.4–25013.6 attracting buy-side stops
- 🏗️ Market Structure: H4 momentum showing exhaustion; M15 sweep and rejection
- ⚡ Imbalances: Inefficiencies below likely to be revisited
- 🎯 Order Blocks: Bearish rejection blocks forming after the sweep
- ⏱️ Timing: Tokyo session consolidation → raid → reversal
A valid LSR hinges on closing behavior: bodies reclaiming range, aggressive wicks rejecting extremes, and clean drives into imbalance. Wait for those elements—entries become low-drama when you do. 🧠
Strategy Implementation & Timing ⏰
🌟 Prime LSR Conditions
H4 Context
Range between 23639.8 and 24925.3
Bias: Bearish after sweep and failure to accept
M15 Execution
Liquidity raid above 24987.4 → brief touch 25013.6 → rejection
Enter on confirmation; manage invalidation decisively
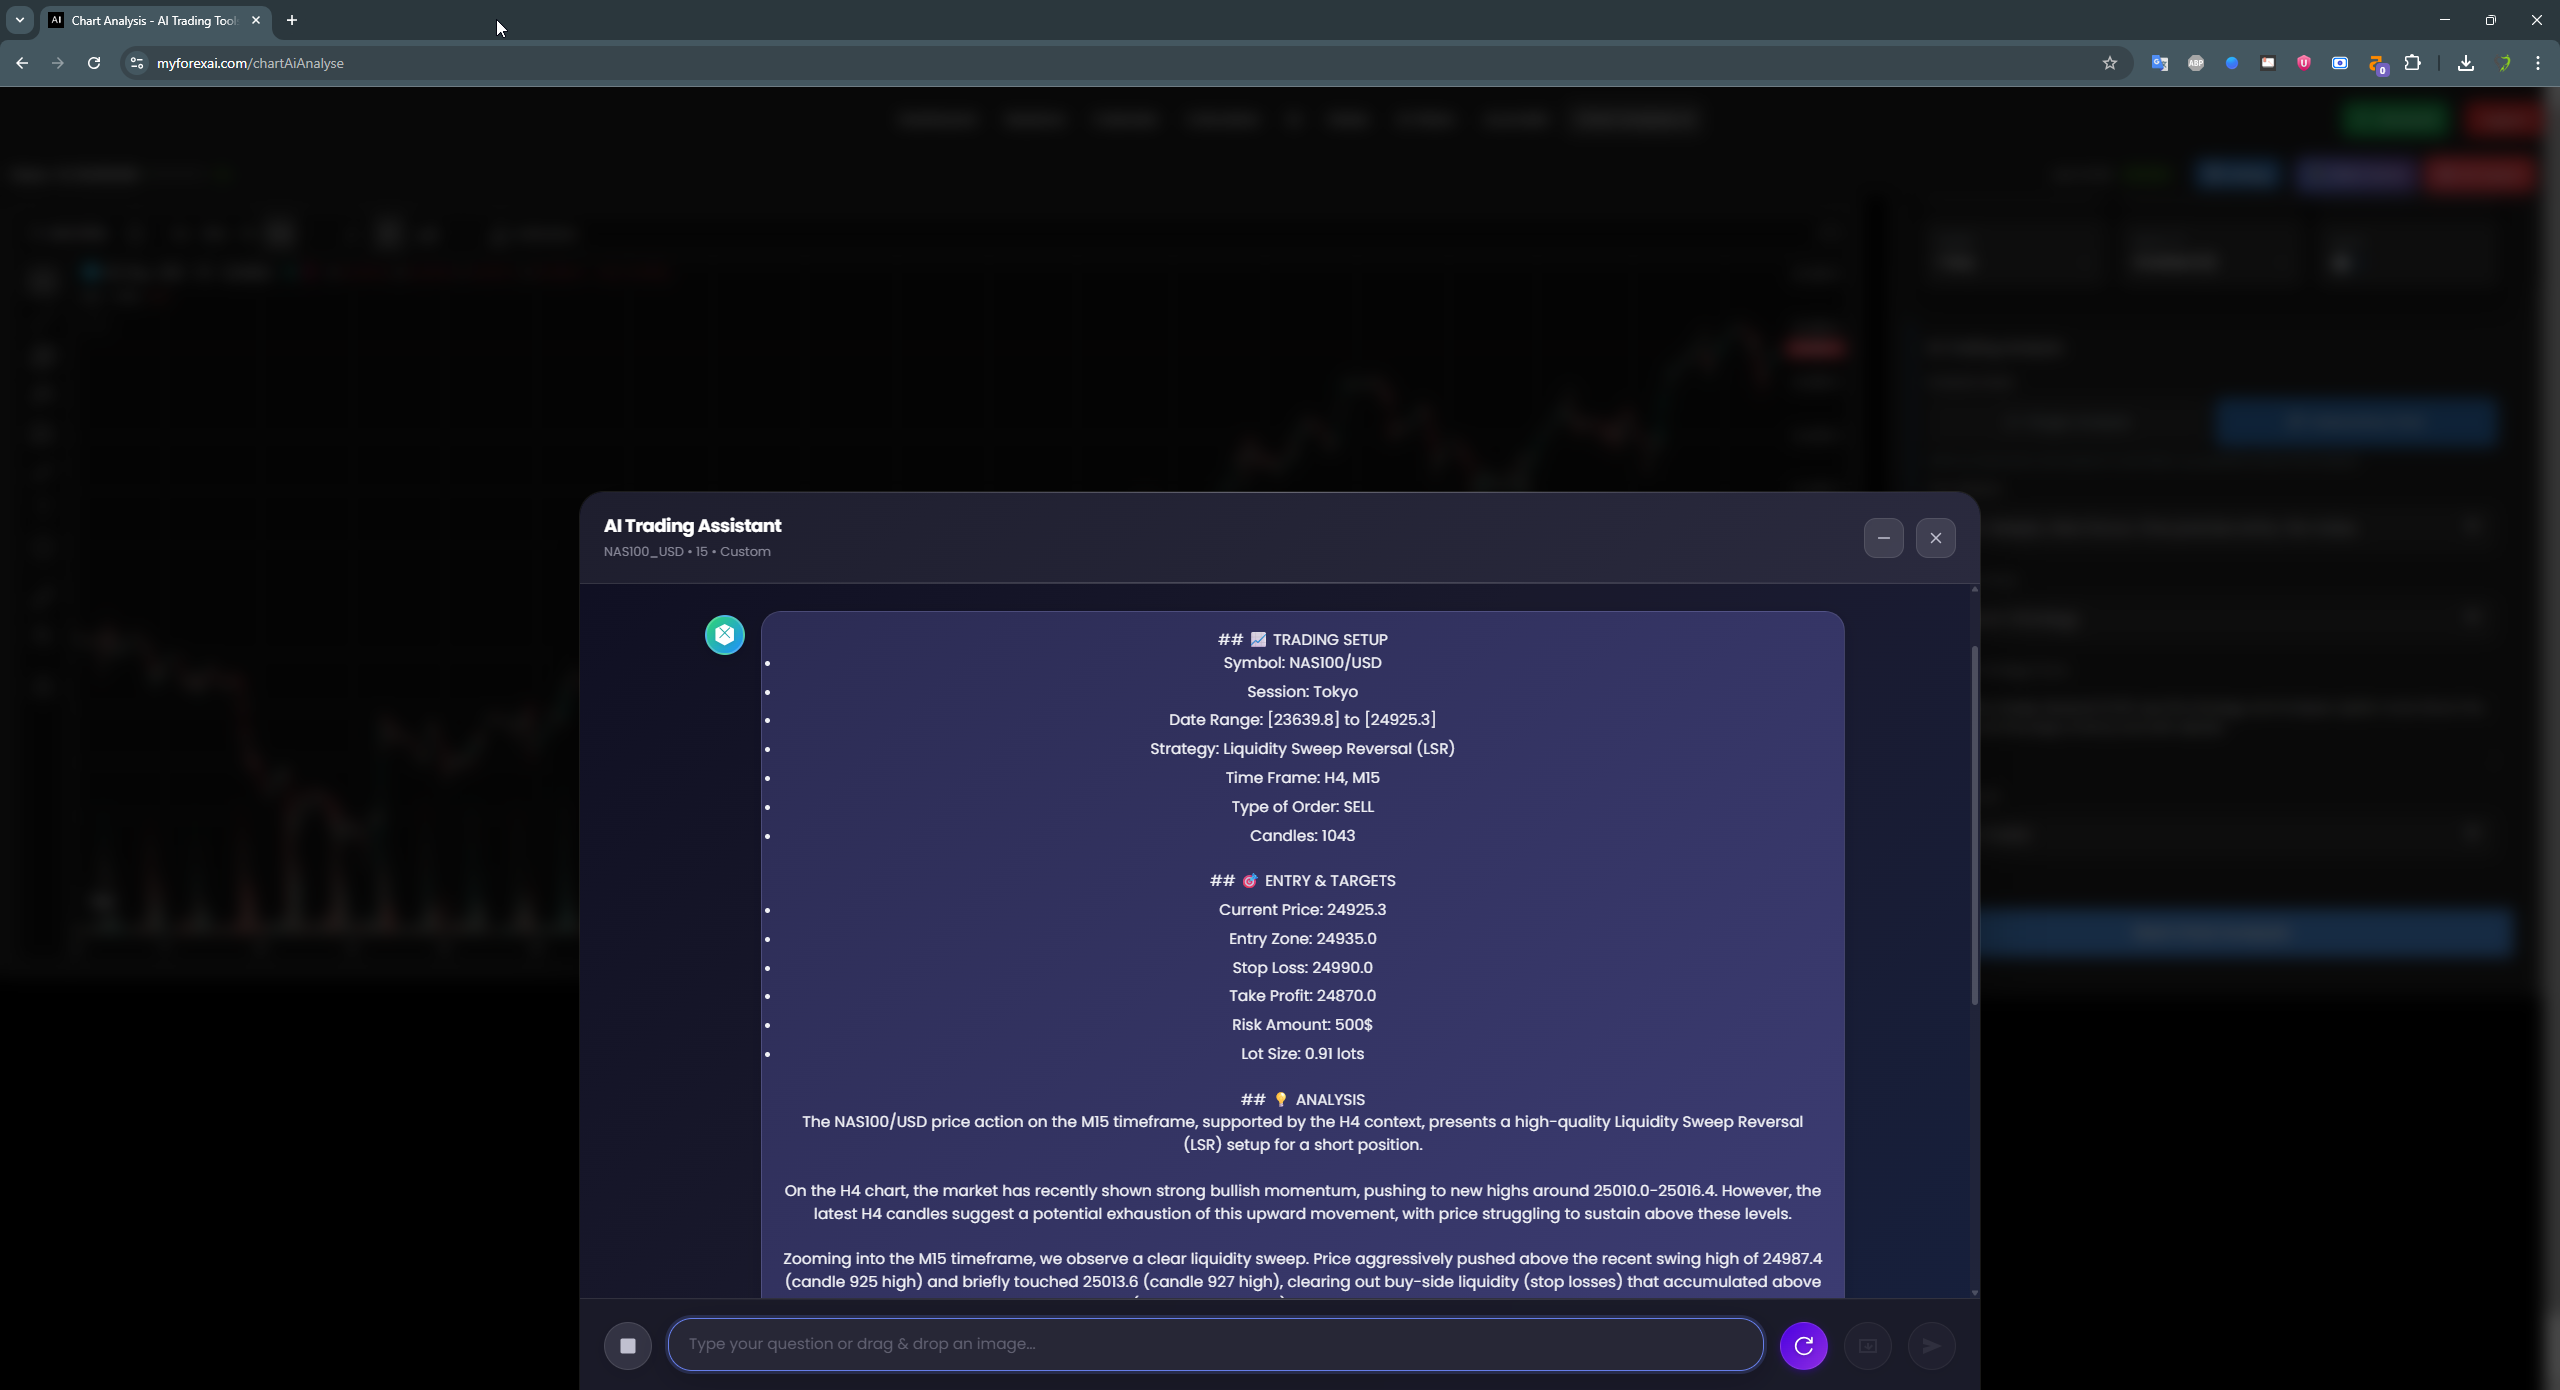
- • Current Price: 24925.3
- • Entry Zone: 24935.0
- • Stop Loss: 24990.0
- • Take Profit: 24870.0
- • Risk Amount: $500
- • Lot Size: 0.91 lots
- • R:R Profile: Favorable short-term continuation
- • Execution: Confirmation on M15 rejection and bearish close
🧪 Validation & Management
Validate with closing behavior, rejection at highs, and displacement away from the sweep. Take partials into inefficiencies and logical lows; trail behind structure. If price reclaims above swept highs and holds, step aside—discipline preserves edge. 🛡️
📈 Live Trading Setup Analysis
On H4, NAS100 pushed into fresh highs near 25010.0–25016.4 before showing exhaustion. The M15 view confirms a liquidity sweep above 24987.4 with a brief spike to 25013.6, then failure to establish acceptance above the raid. Subsequent candles reject higher prices and trade back below the swept zone—classic LSR context for a short. 🔍
🎛️Pair Interface
.png)
Instrument selection interface showing NAS100/USD chosen for LSR analysis.
⏰Time Frame Selection Interface
.png)
Timeframe panel highlighting H4 for context and M15 for execution.
🧠AI Analysis Results Interface
AI output summarizing structure, liquidity, entry, and risk for the short setup.
🎥AI Tools Demonstration Video
Short demo showing how AI tools assist in identifying LSR conditions and execution.
💡 Analysis
The NAS100/USD price action on M15, supported by H4 context, presents a high-quality LSR short. After pushing into new highs around 25010.0–25016.4, momentum shows signs of fatigue. The raid above 24987.4—with a tag of 25013.6—clears buy-side stops and traps late buyers. Crucially, follow-through fails: bodies can’t hold above the swept level, and rejection wicks print conviction.
Execution is anchored at 24935.0, anticipating continuation after confirmation. Invalidation sits at 24990.0, above the raid’s high; if price accepts above that zone, the short narrative is invalid and I’m out—no negotiation. The first objective is 24870.0, where minor support and early liquidity reside. This creates a clean, favorable risk-to-reward profile and keeps decisions unemotional. 🧠
In the Tokyo session, volatility is measured, but liquidity grabs are common. I’m not chasing the sweep; I’m waiting for the failure to accept and displacement lower. Watch for fair value gaps to serve as partials and potential re-entry zones. If price rebalances inefficiency and rejects again, the continuation often stays orderly.
Managing the short: take partials into clear inefficiencies and structure lows; trail the stop behind bearish order blocks or minor swing highs. If price impulsively reclaims above the swept highs and holds, step aside—protecting capital preserves the edge and keeps you available for the next sample. 📉
Remember, my job isn’t to predict every turn—it’s to exploit repeatable sequences: raid → rejection → continuation. Over a 20+ sample set, journaling screenshots of the sweep, rejection, displacement, and management decisions sharpens timing and confidence. Process quality compounds results more than frequency ever will. ✍️
Risk Management & AI Analysis 🛡️
📉 Stop Loss Strategy
- • Place beyond the sweep and invalidation zone
- • Risk 1–2% per trade; here set at $500
- • Account for spread and slippage
- • Respect structure; no “hope” holds
📊 AI Confluence
- • HTF exhaustion aligned with MTF sweep
- • Displacement into imbalance confirms intent
- • Levels tagged: 24935.0, 24990.0, 24870.0
- • Session context: Tokyo favors clean rotations
✨ Trading Wisdom
Successful trading blends sharp analysis, disciplined execution, and a calm mindset. Analysis is your map; emotional control is your compass. Stay patient, trust your ruleset, and manage risk with zero hesitation. 💼
Risk Note: Never risk more than you can afford to lose. Keep risk per trade aligned with plan; here it’s fixed at $500.
Conclusion & Key Takeaways ✅
The LSR short on NAS100/USD is clean: sweep → rejection → continuation within Tokyo’s measured tone. Define invalidation, pre-map objectives, and let your rules drive the click. Consistency beats urgency. 📏
✅ Key Success Factors
- • Map liquidity with precision
- • Wait for failure to accept
- • Use displacement as confirmation
- • Maintain strict risk discipline
- • Journal every sample
- • Leverage AI for confluence
- • Focus on process quality
- • Avoid chasing sweeps
Consistent profitability comes from executing a proven framework with discipline—not from catching every move. The LSR approach, paired with AI analysis, provides a durable edge for modern day traders. 🚀